I wanted to learn some more GPU computing, and particle shaders seemed like a fun thing to learn about. So I decided to try and recreate a game in Godot that mimics Cosmic Sugar, and old VR title that blew my mind back in the days. From this I created a tutorial so that others can do the same.
If you just want the Godot Code: Go grab it here
How to make a Cosmic Sugar clone in Godot: Part 1
If you do not know Cosmic Sugar, it is one of the classic VR psychedelic experience where millions of particles surround you, and with your controllers you will be able to generate force fields that will make the particles flow towards, or be repulsed by each controller. Well if you don’t know it, definitely check it out it is free: Steam page.
In this tutorial, we will start by coding a simple particle shader to control each particles, then we will implement a very simple VR support, and finally we will bind the VR controller actions to the particles shader. In the second part we will continue by making the force fields more than just attraction and repulsion and play with some vector field math.
What you need to know
If you don’t know how to create a scene, or how to parent objects, you should follow the beginner’s tutorial on Godot before you attempt to do this. Also, if you have never seen GLSL shader code, or C, or at minima a typed language, well this might be a little hard to follow, but you can try to learn something here!
The scene
The required nodes
Alright, before we dive into the whole shader part of this project, let’s first setup the scene in Godot, what we want is a particle system and a VR setup. First, create a 3D scene (or start from a spatial node, it’s the same thing) and save it (call it Main?). Then add a Particle node (we want the Particle and not the CPUParticle node as we are going to use that sweet sweet GPU capacity), an ARVROrigin node, and as children of this node, add one ARVRCamera and two ARVRController nodes. Rename the two ARVRcontroller nodes as LeftController and RightController (This is not necessary but it helps to keep things organized). Finally, to be able to see our hands in VR we need a 3D representation of it, also called a Mesh ! For the purpose of this tutorial we are going to simply use a sphere as our hands because it will be sufficiant, add a MeshInstance node to each of the controllers and call them Hand (again keeping things organized !). Your setup should look like this:

The overall configuration of the scene
We need to do a few final configuration steps before we can get started. First, you want to assign a unique ID to each controller so that the underlying VR library knows what to assign to what! Select the RightController and set its Controller ID to 2.


Second, we want to add an actual mesh to our hands. Select each hand and click on the [empty] dropdown in the Mesh field. Select a Sphere (or whatever you fancy to be honest it doesn’t matter much here). Finally, set the scale of the MeshInstance to 0.2 on all three axis.

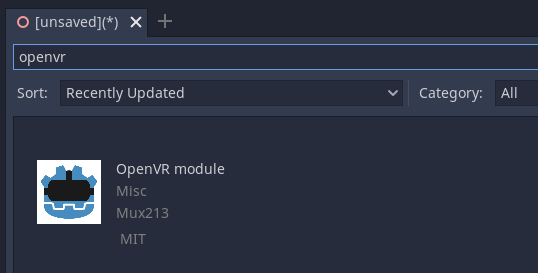
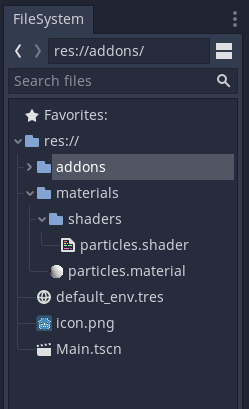
Third, for the VR to work we need to install a VR library. The nodes in Godot serve as instances to be used by different VR backends. Basically, out the multiple existing VR backend there are two that are mostly in use (in 2020!), OpenVR (Vive, Index, SteamVR compatible devices) and OculusVR (Oculus quest, rift). The purpose of this tutorial isn’t really to discuss the different backend so we are going to just download the OpenVR one (because I have a Vive headset). Go to the asset store AssetLib and search for OpenVR. Download and install it, it will create an addons folder and place all of its magic there.

Fourth, our Particle system doesn’t seem to be happy as a yellow exclamation mark is next to it, what it is lacking is a key component, a particle material, which will contain our particle shader. This will be the main topic for the rest of this tutorial so let’s just go ahead and create one. In the Particle inspector, open Process material and click on the [empty] and select New ShaderMaterial. This will create a new material, and at the bottom you will see the field Shader. Click on the [empty] and select New Shader. Ok finally we are going to save our material and our shader as files so that it is easier to find them. Click on the down arrow next to the material and click Save, crate a folder called materials and inside of it a folder called shaders. Save your material as particles.material in the material folder, then repeat those steps with the shader. Click on the down arrow and click Make Unique then click Save and place it in the shaders folder and call it particles.shader. Now everytime we want to edit the shader code we can simply double click on the shader file! Then, we will increase the number of particles, lets start with a small value, say 200000. Finally, we want our particle to have an incarnation in 3D, but we want millions of them, so we cannot affort complex meshes, let’s go for the very simple Dot. Click on Draw Passes and click on the [empty] next to Pass 1 and select New PointMesh. Then assign a new material to this mesh by clicking on the [empty] field. Create a New ShaderMaterial and add a New Shader. Then click on the shader and copy paste those lines (this tutorial is not about fragment shaders):
shader_type spatial;

void fragment() {
	EMISSION = COLOR.xyz;
}

The Particle Shader
So first, you should probably at least read the godot Shader and the Particle Shader documentations. Have a read, it’ll help you understand what’s going to happen. Once you feel ready, double click on that particle.shader file we saved before. You should see this:

If you have read the documentation, you’ll know what to do! (Also it’s literally written in red!)
The concept
What we are going to use here is the power of multiplexed computation on the GPU to change the movement of the particles given a force field (it is called a Vector Field in math!). The thing with GPU computing is that each piece of code is run independently of the other ones, so we cannot share states between objects easily (sorry this is an oversimplification but GPU computing takes a book to fully explain). In our case it won’t be a problem though, at each frame we will compute the direction a particle needs to go to which only requires knowledge of a few “fixed” things (fixed as in for a given frame, this will not change, though between frames those values might change). In summary, to create a Force Field effect each particle will need to know the following things:
- The position of the attractor/repulsor, in our case the VR controllers
- The state of the attraction repulsion, are we neutral, attracting or pushing away
- Its own position and velocity
The uniform variables
In GLSL shader code, we can defined such “fixed” variables as uniform (uniform across all computation, aka “fixed”). According to the documentation, the Godot engine provides us with built-in variables for the position (inout mat4 TRANSFORM Particle transform) and velocity (inout vec3 VELOCITY Particle velocity) in the Vertex function. Notice the inout part? Well that means that Godot both provides us with the current value, but we can also override it! Let’s define the other variables
shader_type particles; //Well now you know how to fix that error above right?

// The controlers positions as a vec3 for X Y and Z
uniform vec3 LeftController_position;
uniform vec3 RightController_position;

// The controller states so that we can switch between attracting and pushing away
uniform int LeftController_state;
uniform int RightController_state;
Pseudo random function
Alright, one thing that GLSL or Godot doesn’t really implement (such a shame …) is a Random Number generator. Why do we need this you asked? Well, how else are we going to generate millions or particles randomly scattered in our psychedelic universe we are creating?!? In short, we need a random number generator function so that we can instanciate each particle at a random location in our scene.
I have shamelessly stolen this bit of code from the godot particle shader tutorial which in turn stole it from the Godot source code of the ParticleMaterial. Let’s just copy past it and not wonder how it does what it does!
...
uniform vec3 RightController_state;

// This creates a random number from a seed number
float rand_from_seed(in uint seed) {
  int k;
  int s = int(seed);
  if (s == 0)
    s = 305420679;
  k = s / 127773;
  s = 16807 * (s - k * 127773) - 2836 * k;
  if (s < 0)
    s += 2147483647;
  seed = uint(s);
  return float(seed % uint(65536)) / 65535.0;
}

uint hash(uint x) {
  x = ((x >> uint(16)) ^ x) * uint(73244475);
  x = ((x >> uint(16)) ^ x) * uint(73244475);
  x = (x >> uint(16)) ^ x;
  return x;
}
Vertex function
It is time, the vertex function is to be started, this function is the main, it is what will be called for each particle. so let’s just write an empty one. Because we are in a Particle system in Godot, it is also in this function that we will need to deal with the initialization of our particle. In short, when a particle is created, the vertex function will be called and the special variable RESTART will be set to true. In all other instances, this will be set to false. This allows us to split the execution between init and exec. Let’s create the vertex function.
...
return x;
}

void vertex() {
  if (RESTART) { // initialization!
    // we will write something here
  }
  // execution at each frame
}
Initialization
Ok let’s start with the simple things first! We want to initialize our particle at a random location. To get a random number we use that sweet magic from up there! Huh wait, but how? Well, each particle in Particle system has a unique number (in uint NUMBER: Unique number since emission start.) and a random seed (in uint RANDOM_SEED Random seed used as base for random). Lets first pass this to our hash function (just because) and then use that hash as a seed to our random function (why well I don’t know but we don’t get any good value otherwise?). (I am skipping over the fact that the random function returns a number between 0 and 1 and we want a position between -1 and 1 so we random * 2.0 - 1.0) Then using this position vector we set the TRANSFORM matrix third column (google transformation matrix if you don’t understand why). Oh, and while we are at it, let’s make this whole thing pretty? We are in the business of psychedelic after all! Let’s set the COLOR as our position value, but squared (pow() power of function, square is power of 2) to avoid having black particles.
void vertex() {
  if (RESTART) {
    uint seed_x = hash(NUMBER + uint(27) + RANDOM_SEED);
    uint seed_y = hash(NUMBER + uint(43) + RANDOM_SEED);
    uint seed_z = hash(NUMBER + uint(111) + RANDOM_SEED);
    vec3 position = vec3(rand_from_seed(seed_x) * 2.0 - 1.0,
                         rand_from_seed(seed_y) * 2.0 - 1.0,
                         rand_from_seed(seed_z) * 2.0 - 1.0);
    TRANSFORM[3].xyz = position * 20.0;
    COLOR = vec4(pow(position, vec3(2.0)), 1.0);
  }
}
Now the magic should start on your screen:
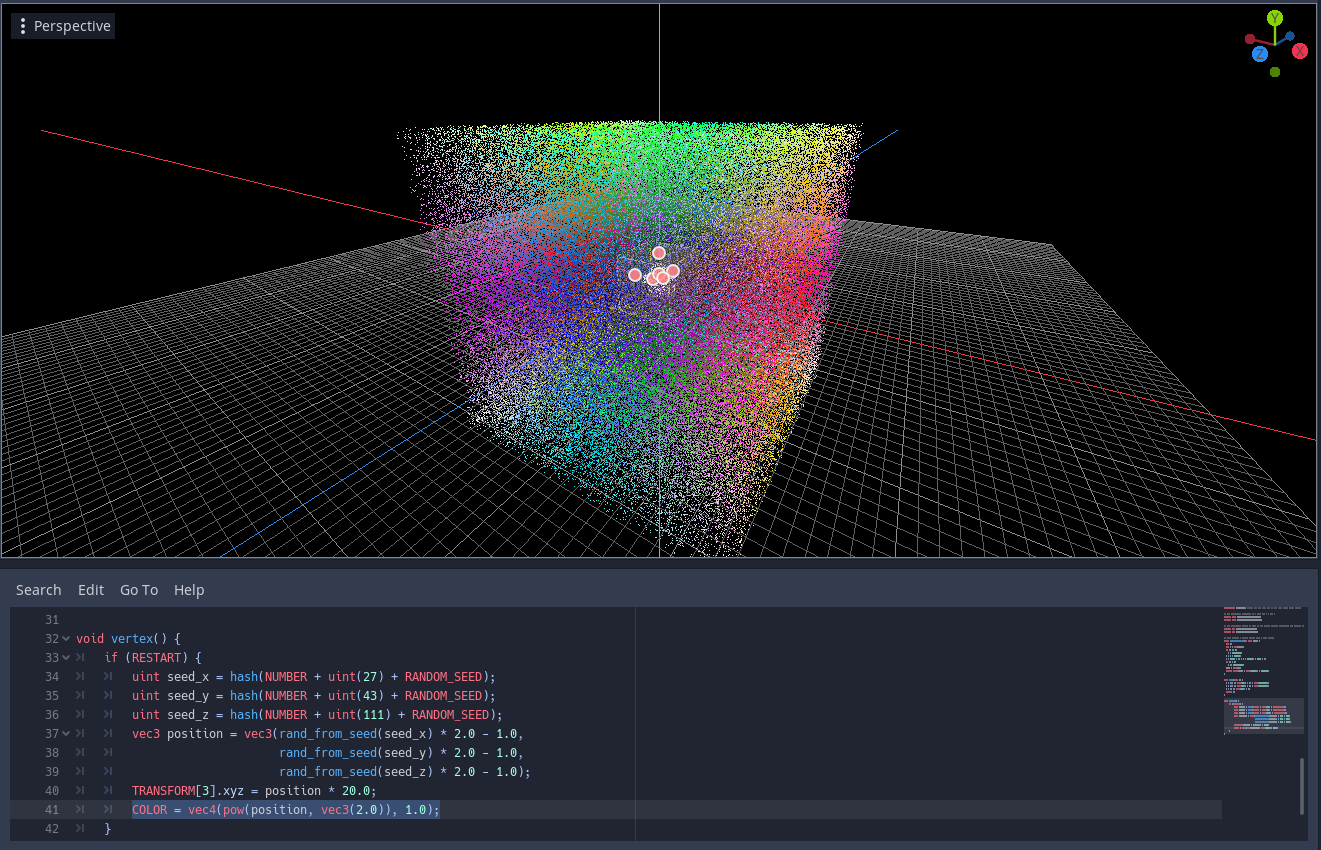
That’s it for Part 1, next we will learn about Vector Fields and how to apply them to our system. Your particle shader should look like:
shader_type particles; //Well now you know how to fix that error above right?

// The controlers positions as a vec3 for X Y and Z
uniform vec3 LeftController_position;
uniform vec3 RightController_position;

// The controller states so that we can switch between attracting and pushing away
uniform int LeftController_state;
uniform int RightController_state;

// This creates a random number from a seed number
float rand_from_seed(in uint seed) {
  int k;
  int s = int(seed);
  if (s == 0)
    s = 305420679;
  k = s / 127773;
  s = 16807 * (s - k * 127773) - 2836 * k;
  if (s < 0)
    s += 2147483647;
  seed = uint(s);
  return float(seed % uint(65536)) / 65535.0;
}

uint hash(uint x) {
  x = ((x >> uint(16)) ^ x) * uint(73244475);
  x = ((x >> uint(16)) ^ x) * uint(73244475);
  x = (x >> uint(16)) ^ x;
  return x;
}

void vertex() {
	if (RESTART) {
		uint seed_x = hash(NUMBER + uint(27) + RANDOM_SEED);
		uint seed_y = hash(NUMBER + uint(43) + RANDOM_SEED);
		uint seed_z = hash(NUMBER + uint(111) + RANDOM_SEED);
		vec3 position = vec3(rand_from_seed(seed_x) * 2.0 - 1.0,
		                     rand_from_seed(seed_y) * 2.0 - 1.0,
		                     rand_from_seed(seed_z) * 2.0 - 1.0);
		TRANSFORM[3].xyz = position * 20.0;
		COLOR = vec4(pow(position, vec3(2.0)), 1.0);
	}
}
How to make a Cosmic Sugar clone in Godot: Part 2
Vector fields
If you have never taken a physics course on magnets, or fluids, you probably have not learned about Vector Fields. If that’s the case, its fine, it is actually not a very hard mathematical tool to understand (at least at the level we need it!). I highly reccomend you spend 20 minutes of your life watching the Khan academy class about vector fields, it is (as all Khan academy classes) really well done.
In short, a vector field is a mathematical function which, for any point in space x, y, and z returns a 3D vector (we are in 3D so I am going to assume a 3 dimentional space from now on, but vector fields word in N dimensions). A simple example is the identity function:
f(x, y, z) = [x, y, z]
If we evaluate this function at x = 2, y = 3 and z = -2, we will get in return the vector: [2, 3, -2]. If we keep on evaluating this function at many points, we can then draw a vector representation of this space. (If you want to experiment with vector fields, you can play with equations on GeoGebra)
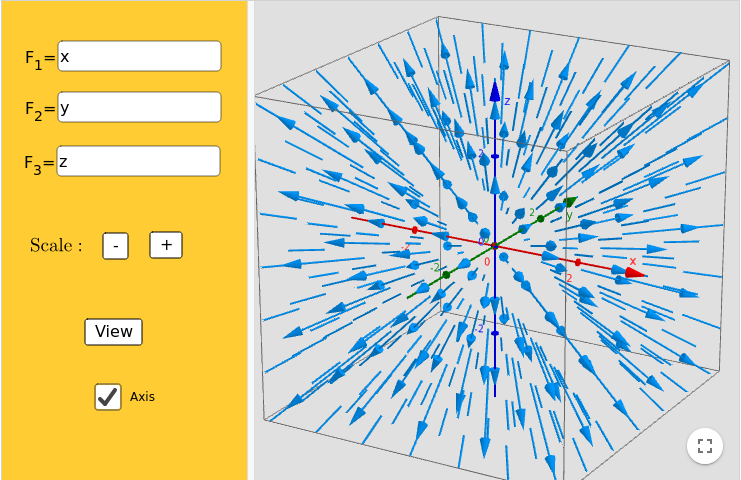
As you can see, the further away from the origin we are, the stronger the vector becomes.
If we try another function, we can get an interesting flat field:

But how is this math any use to us ??? Well, as we said above, a vector field is a 3D function, that for any point will return a vector. Hum… a particle exist in space, and it has a coordinate. If we want to influence it we can change its velocity, which is a 3D vector … So if we could sample a vector field at the 3D coordinate of our particle it would give us the velocity for that particle!
A simple attractor field
Ok let’s do some math! As a good basic vector field, we can try to model an attractor uniform field. Let’s come back to our identity function f(x, y, z) = [x, y, z]. When we plot it we can realize that first, it will push the particles away from the center at 0, 0, 0.
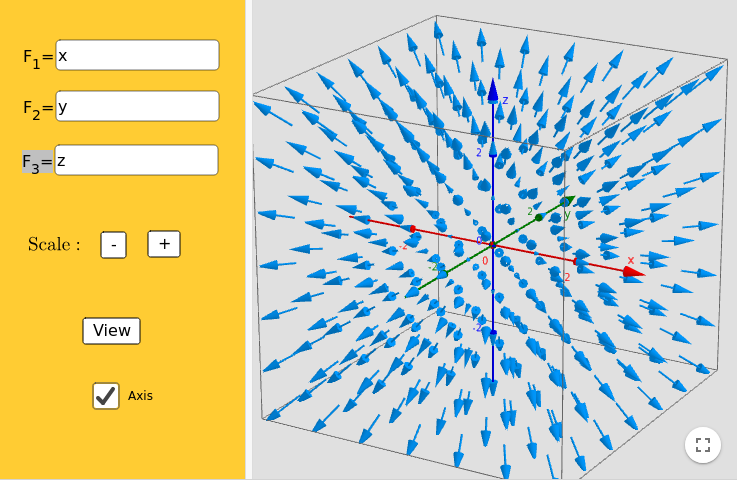
So we need to change two things, first we want to attract, so we reverse the field simply by multiplying it by -1: f(x, y, z) = [-x, -y, -z].
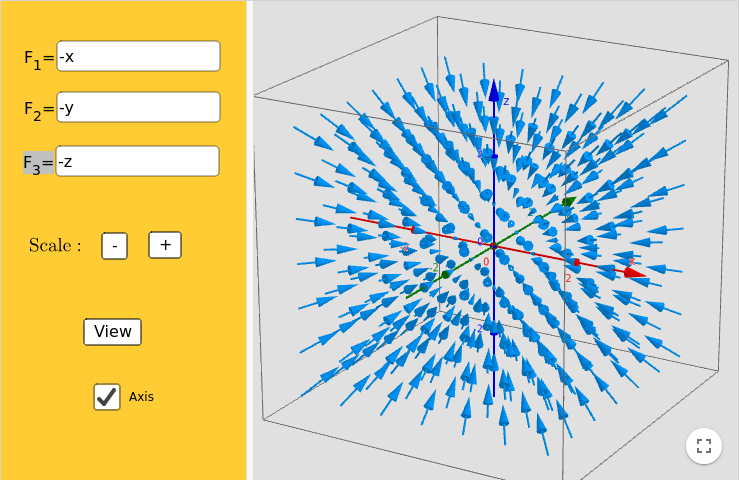
Second, we want the field to be centered around our controller! So we need to change the center by adding the coordinate of our controller that I will name here C.x C.y and C.z: f(x, y, z) = [-x + C.x, -y + C.y, -z + C.z]. Let’s assume the controller is at position C = [1, 2, -2].
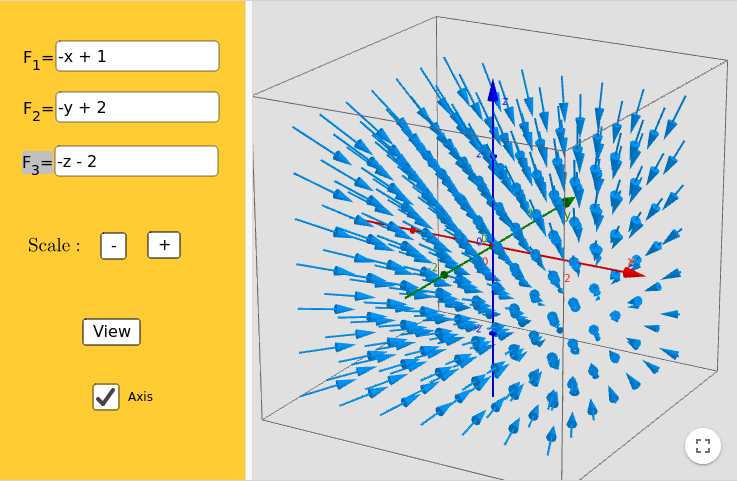
Now as you can see, the vectors are increasing in intensity the further away they are to the center, this could be something you want, but, in general it is good that the vector field function is bounded (has a min and max) so that the system does not “explode”. The simplest way to avoid this behavior is to normalize each vector. To normalize a vector, one must divide it by its length, and the length of a vector is defined as the square root of the sum of its valued squared: length = sqrt((-x + C.x)^2 + (-y + C.y)^2 + (-z + C.z)^2). Therefore our function becomes: f(x, y, z) = [-x + C.x / length, -y + C.y / length, -z + C.z / length]
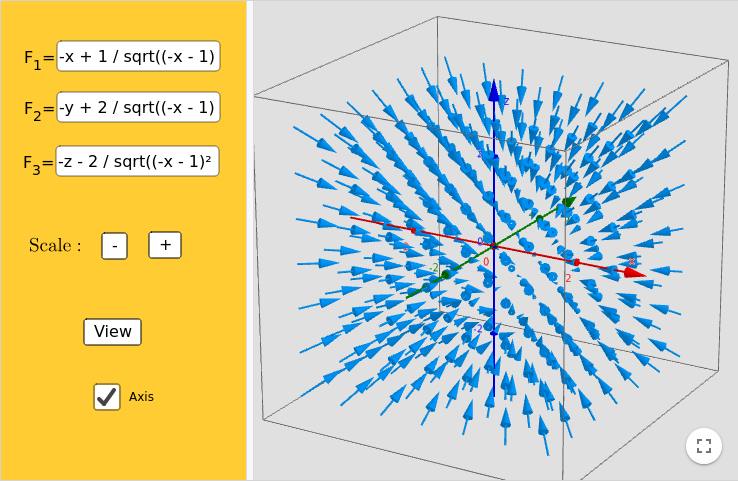
The issue now is that all vectors have length of 1, so the velocity of the particles is going to be small. The final step will be to rescale this to our scene scale by multiplying this vector by a scalar f(x, y, z) * scale.
Shader implementation of a vector field
Ok so we simply need to define a function that can take a position and return the sampling of a vector field at that point, let’s call it get_velocity and give it the position of the particle as a parameter. Notice that we write this function above the vertex function? Well that is because GLSL compiler will read the code from top to bottom, and if the function is not yet defined it will complain about it missing…
vec3 field_gravity(vec3 position, vec3 center, float scale) {
  // compute the length of the vector
  float length = sqrt(pow((-position.x + center.x), 2.0) +
                      pow((-position.y + center.y), 2.0) +
                      pow((-position.z + center.z), 2.0));
  // compute the value of the vector fields
  vec3 vector = vec3((-x - center.x) / length,
                     (-y - center.y) / length,
                     (-z - center.z) / length);
  // finally rescale the vector
  vector = vector * scale;
  return vector;
}

void vertex() {
  ...
Ok, in reality though we don’t need to write this very long and error prone function, we can do the exact same math in one line using GLSL math functions:
vec3 field_gravity(vec3 position, vec3 center, float scale) {
  return normalize(-position + center) * scale;
}
Next we need to handle the fact that we have two controllers! we are going to do a simple vector addition.
vec3 get_velocity(vec3 position) {
  // we divide by the number of controller such that the maximum velocity is bounded to our value
  float scale = 5.0 / 2.0;
  // We compute the vector field with the two centers
  // Then we multiply the value by the controller state, which is 1 for attracting, -1 for pushing away and 0 for neutral.
  vec3 left_velocity = field_gravity(position, LeftController_position, scale) * LeftController_state;
  vec3 right_velocity = field_gravity(position, RightController_position, scale) * RightController_state;
  // Finally we sum the two vector fields and return the velocity
  vec3 velocity = left_velocity + right_velocity;
  return velocity;
}
Finally, we implement our function into our main loop. Remember that TRANSFORM[3].xyz is the position of our particle, and that VELOCITY is an inout value that we can change.
void vertex() {
	if (RESTART) {
   ... // the code from part 1
	}
  VELOCITY = get_velocity(TRANSFORM[3].xyz);
}
And nothing happens … well, we have not given any values to our controllers position and state uniform variable, so to just test if our code even works, let’s change their initialization value:
// The controlers positions as a vec3 for X Y and Z
uniform vec3 LeftController_position = vec3(5.0);
uniform vec3 RightController_position = vec3(-5.0);

// The controller states so that we can switch between attracting and pushing away
uniform int LeftController_state = 1;
uniform int RightController_state = 1;
And then suddenly the particles are moving !
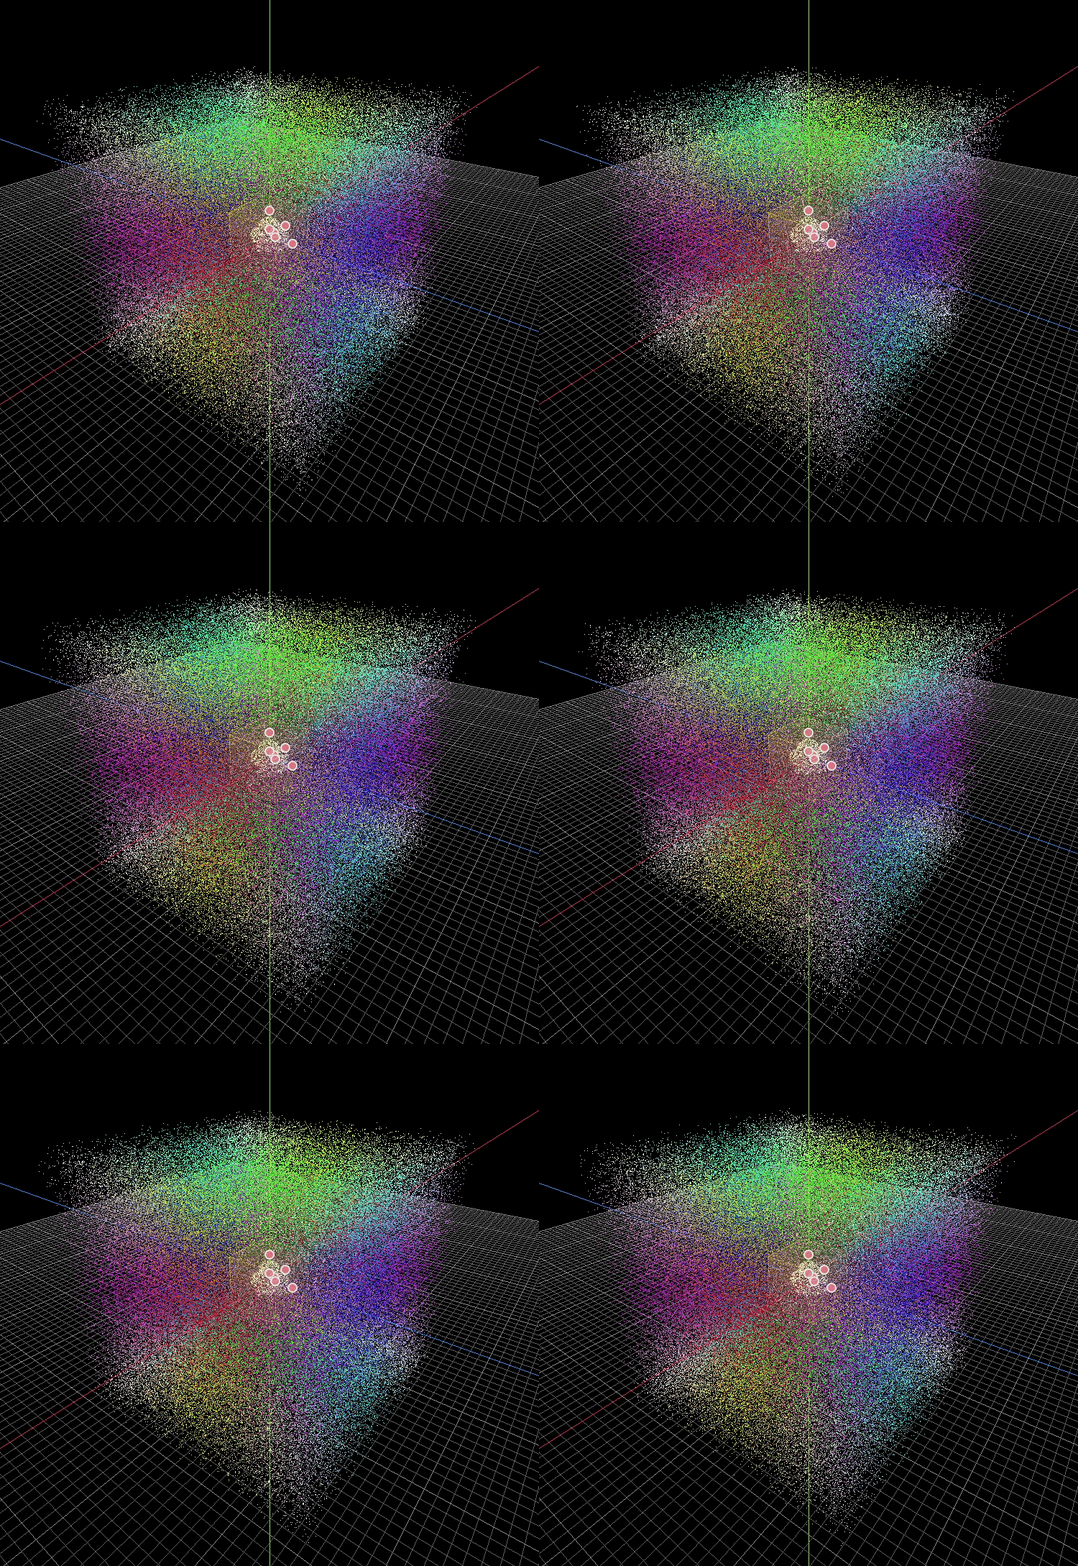
But clearly, this doesn’t look like Cosmic Sugar, that’s because the particles have a short life time of 1 second, we need to increase this value. At 10 seconds, it is accumulating more particles.
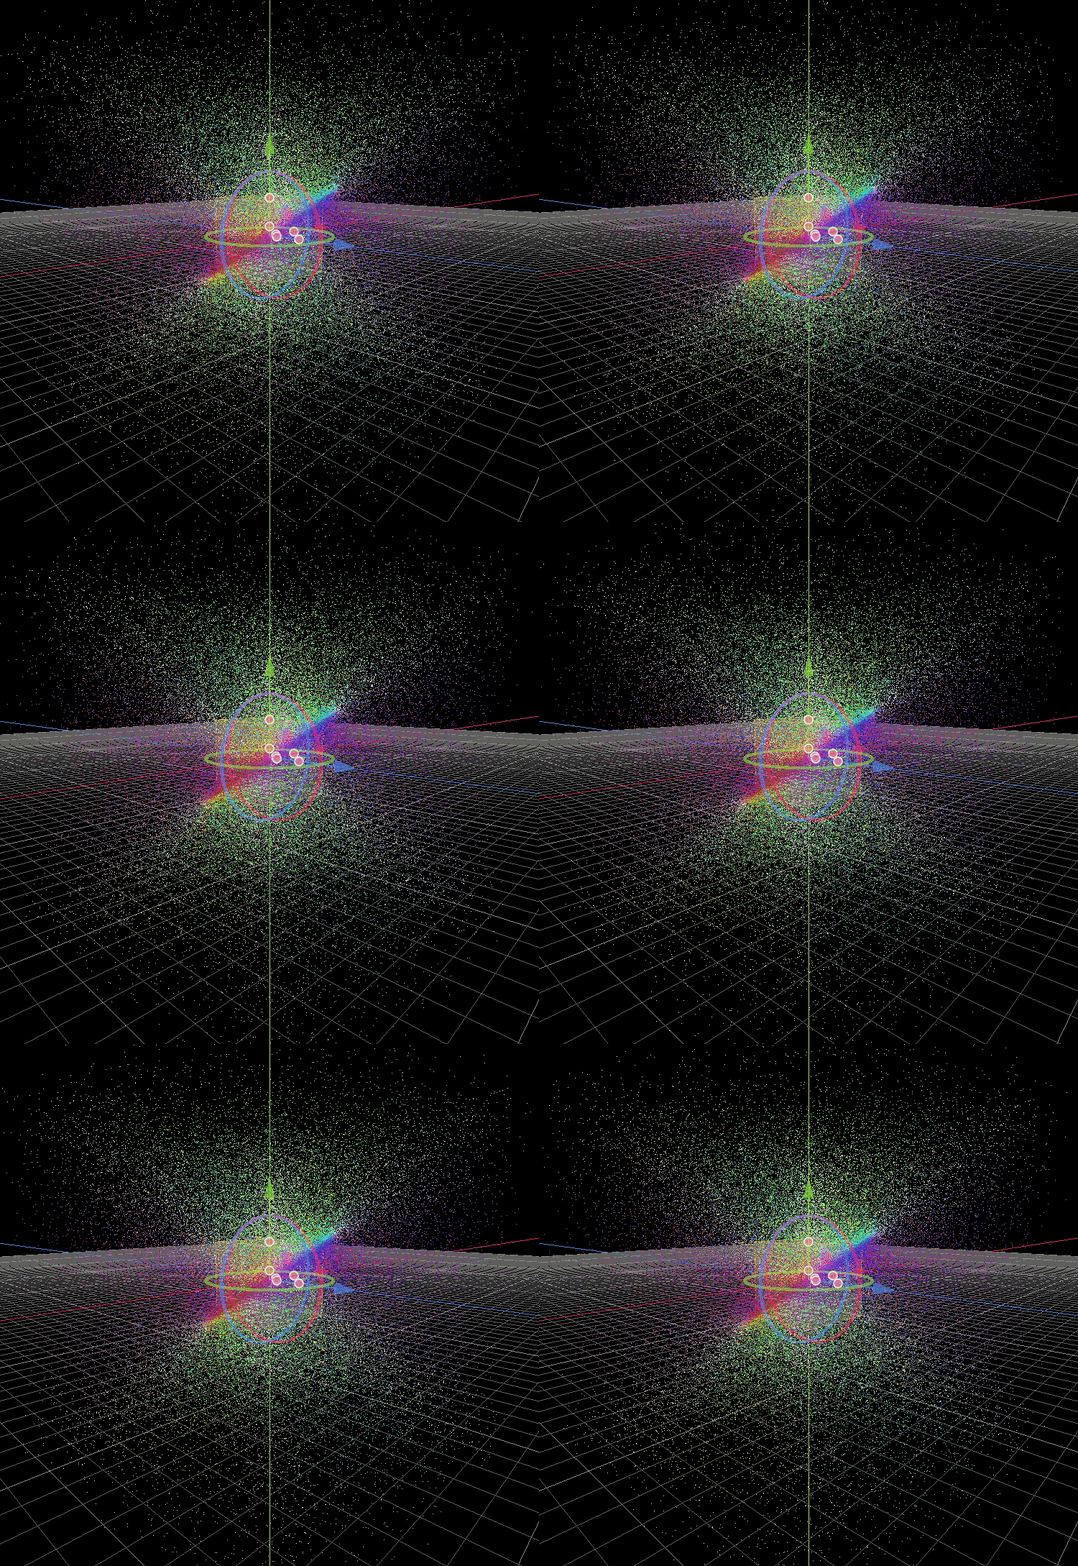
And at 100 seconds, it looks much more like Cosmic Sugar. Remember that we are aiming for a dynamic simulation with controllers, so it needs to accumumate so that you feel like you are manipulating the particles
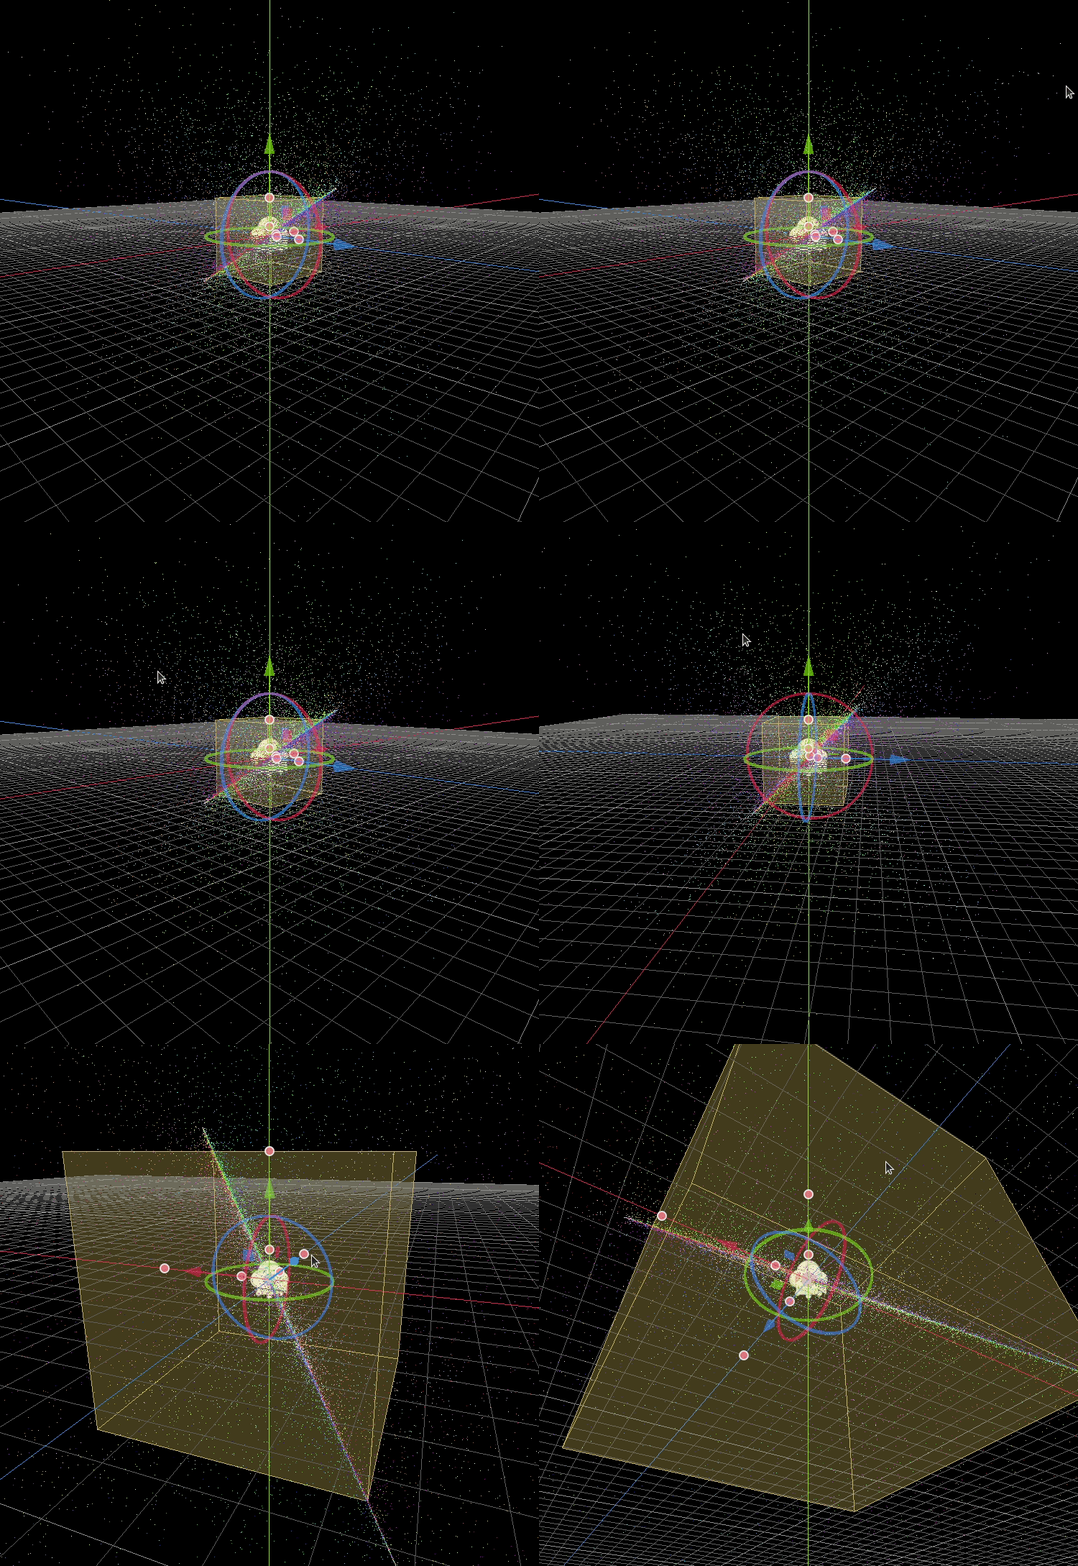
Conclusion
In Part 2 we created the shader code required to control our particles and apply a vector field to them. In the next part we will bind the controllers to the ParticleShader by injecting the position and states onto its uniform variables. The final shader code should look like this:
shader_type particles;

uniform vec3 LeftController_position = vec3(5.0);
uniform vec3 RightController_position = vec3(-5.0);

uniform int LeftController_state = 1;
uniform int RightController_state = 1;

float rand_from_seed(in uint seed) {
  int k;
  int s = int(seed);
  if (s == 0)
    s = 305420679;
  k = s / 127773;
  s = 16807 * (s - k * 127773) - 2836 * k;
  if (s < 0)
    s += 2147483647;
  seed = uint(s);
  return float(seed % uint(65536)) / 65535.0;
}

uint hash(uint x) {
  x = ((x >> uint(16)) ^ x) * uint(73244475);
  x = ((x >> uint(16)) ^ x) * uint(73244475);
  x = (x >> uint(16)) ^ x;
  return x;
}

vec3 field_gravity(vec3 position, vec3 center, float scale) {
  return normalize(-position + center) * scale;
}

vec3 get_velocity(vec3 position) {
  float scale = 5.0 / 2.0;
  vec3 left_velocity = field_gravity(position, LeftController_position, scale) * float(LeftController_state);
  vec3 right_velocity = field_gravity(position, RightController_position, scale) * float(RightController_state);
  vec3 velocity = left_velocity + right_velocity;
  return velocity;
}

void vertex() {
	if (RESTART) {
		uint seed_x = hash(NUMBER + uint(27) + RANDOM_SEED);
		uint seed_y = hash(NUMBER + uint(43) + RANDOM_SEED);
		uint seed_z = hash(NUMBER + uint(111) + RANDOM_SEED);
		vec3 position = vec3(rand_from_seed(seed_x) * 2.0 - 1.0,
		                     rand_from_seed(seed_y) * 2.0 - 1.0,
		                     rand_from_seed(seed_z) * 2.0 - 1.0);
		TRANSFORM[3].xyz = position * 20.0;
		COLOR = vec4(pow(position, vec3(2.0)), 1.0);
	}
	VELOCITY = get_velocity(TRANSFORM[3].xyz);
}
How to make a Cosmic Sugar clone in Godot: Part 3
VR initialization
The next part of this tutorial will require to test things in VR to be able to check whether what we did is working, so it is time to setup the VR initialization of the main scene.
As one should always do, the first thing to do is to read the documentation on VR right? Oh but like VR has many headset and many libraries how am I going to figure this out -> realize the madness, go cry for a second, breath, ok !
So I’ll be presenting how to setup “OpenVR” which is the implementation developped by Steam and used by the HTC Vive and Valve Index (The documentation is on GitHub). Oh yeah so if you want info on other HMDs, well a good place to start is the VR Primer but it is a bit tricky to find good information.
Ok so, as per the “OpenVR” documentation we need to do two things, initialize our headset and set the rendering engine of Godot to use Linear Color space. Go ahead a create a new GDscript for the root node of our main scene, call it Main.gd and place it in the script folder.
Then on _ready let’s initialize and set rendering options:
extends Spatial

func _ready():
  # This will try and find a compatible and connected VR interface
	var VR = ARVRServer.find_interface("OpenVR")

	# Then we test, to see if we found one, and if it initialized ok, because if we did not, well we need to write a catch or someting.
	if VR and VR.initialize():
		# This tells Godot that we have a VR headset, so please activate all the magic
		get_viewport().arvr = true

		# This is the necessary trick so that we don't need to deactivate the HDR capacity of Godot
		get_viewport().keep_3d_linear = true

    # Disable Vsync so that we get that sweet 90FPS we need to not puke in VR
    OS.vsync_enabled = false

		# Also, the physics FPS in the project settings is also 90 FPS. This makes the physics
		# run at the same frame rate as the display, which makes things look smoother in VR!
		Engine.target_fps = 90
	else:
		# Here you will want to write some function that says that no VR headset was found -> sad
		pass
All good, at this point, you should be able to plug in your headset, start SteamVR, and launch the scene (with F6). If all went well, you should see the particles around you, and they should go towards points in space. Your hands are spheres and you can move them.
Common issue with hands not in the right place
If you experience that your hands are not where your controllers are, make sure that the transform of the “Hand” mesh instance is set as 0,0,0 for the translation. Otherwise you will get some weird motion artifacts due to the parents movement.
VR controllers
Ok, we can see but we cannot do anything yet! It is time to add some logic to our VR controllers. First off, we want to create a script that we will use to communicate the states of our controllers to our ParticleShader. There are two ways to code this, either the controller will inform the particle system about the state, or the particle system will pull info from the controller. Here I’ll send information because we have a very simple scene, but if you had a more complex scene then defining states and checks the other way will be cleaner.
Let’s select the LeftController and add a script called VRController.gd (keep things tidy, place it in the script folder).
Alright, we will need to define a few things in this script so that things can run smooth. We will need:
- The controller identity (Left or Right)
- A pointer to our Particle system so that we can interact with its material
- An event function to catch a button press
- An event function to catch a button release
- A method to send our controllers positions at each frame (that we will call from the physics process)
Ok let’s start with the particle system because that’s trivial, we just go in the arborescence and preload it. And while we are at it, we also grab the material and set it as a global variable. Then we define some global variables we will need. Because we have two controllers and that we defined in our shaders the position and state of each controller, we need to store this information.
extends ARVRController

# Get the particle instance
onready var particles = get_node("../../Particles")
# Get the particle material
onready var particles_material = particles.get_process_material()

# Define some helper variables for the right a left controllers
var shader_controller_position
var shader_controller_state
Then we define our functions that will need:
extends ARVRController

onready var particles = get_node("../../Particles")
onready var particles_material = particles.get_process_material()

func _ready():
  pass

func _physics_process(delta):
  pass

func _set_position():
  pass

func _set_state(state):
  pass

func _event_button_pressed(button_index):
  pass

func _event_button_released(button_index):
  pass
Next we will get the controller ID so that we can send the correct information to the ParticleShader. As per the documentation we can get the controller id with get_controller_id, or we can just access the built in variable controller_id. So let’s just use the built in and set some helpers for the rest of the code:
_func ready():
  if controller_id == 1:
    # Those are the name of the uniforms we wrote at the beginning of our shader code!
    shader_controller_position = "LeftController_position"
    shader_controller_state = "LeftController_state"
  elif controller_id == 2:
    shader_controller_position = "RightController_position"
    shader_controller_state = "RightController_state"
  else:
    print("The controller ID is outside of the legal values (1: Left, 2: Right)")
We also need to add the even binding system to our ready function such that button press and button release works:
_func ready():
  ...
  connect("button_pressed", self, "_event_button_pressed")
  connect("button_release", self, "_event_button_released")
Let’s continue by writing our function that will send the information to the shader, let’s start with the position. As per Godot documentation (Again!?) the position of our controller is stored in the Transform, at the Origin. Also, to set a material shader value, we need to use the set_shader_param function which takes the uniform name (Case sensitive) and the value to pass. We already defined the name to use above, so we are going to use it here: shader_controller_position.
func _set_position():
  var position = transform.origin
  particles_material.set_shader_param(shader_controller_position, position)
Let’s do the same with the state, but because the state is dynamic, we want to give it as a parameter so its easier to code it and cleaner to read.
func _set_state(state):
  if state in [-1, 0, 1]:
    particles_material.set_shader_param(shader_controller_state, state)
  else:
    print("Error the state is not a valid state")
Notice how I keep adding if else statements with a print error message? Those are reallllllllly useful in debugging!
Next, for the button events, I am here showing a “Hacky” way of doing it. There exists an “Action Binding” implementation that is 1000x more potent and clean and that should be used if you are making something to be released. You can learn more about it here.
If you don’t know the biding of your controllers you can just write this:
func _event_button_pressed(button_index):
  print(button_index)

func _event_button_released(button_index):
  print(button_index)
But I am going to assume the biding for the Vive controllers:
- Trigger button: button_index == 15
- Grip button: button_index == 2
We now simply need to do a simple switch case and we are good. Oh sorry, I meant a Match function because why follow conventions? Let’s just add a print statement, launch the game, and press the buttons to see if it is working:
func _event_button_pressed(button_index):
  match button_index:
    15:
        print("Trigger pressed")
    2:
        print("Grip pressed")

func _event_button_released(button_index):
  match button_index:
    15:
        print("Trigger released")
    2:
        print("Grip released")
All good then let’s do some state sending!
func _event_button_pressed(button_index):
  match button_index:
    15:
        print("Trigger pressed")
        _set_state(1)
    2:
        print("Grip pressed")
        _set_state(-1)

func _event_button_released(button_index):
  match button_index:
    15:
        print("Trigger released")
        _set_state(0)
    2:
        print("Grip released")
        _set_state(0)
You might notice a problem here, if I press the trigger AND the grip together this will override the trigger, and if I release the grip, the trigger won’t work anymore. A cleaner way to code this is to define both states in variables (bool trigger_pressed and bool grip_pressed) and to do the logic inside the _set_state function. Let’s say its homework?
Alright finally we just need to get the _physics_process function and we are done with the code. At each frame, we want to send the position of our controllers. It is as trivial as just calling our position update function every frame:
func _physics_process(delta):
  _set_position()
Voila !
Now we just need to add that script to the RightController, select it in the scene, and at the bottom in the script section select [empty] then load. Find the VRController.gd script and load it.
The final script should look like this:
extends ARVRController

onready var particles = get_node("../../Particles")
onready var particles_material = particles.get_process_material()

var shader_controller_position
var shader_controller_state

func _ready():
	if controller_id == 1:
		shader_controller_position = "LeftController_position"
		shader_controller_state = "LeftController_state"
	elif controller_id == 2:
		shader_controller_position = "RightController_position"
		shader_controller_state = "RightController_state"
	else:
		print("The controller ID is outside of the legal values (1: Left, 2: Right)")
	connect("button_pressed", self, "_event_button_pressed")
	connect("button_release", self, "_event_button_released")

func _physics_process(delta):
  _set_position()

func _set_position():
	var position = transform.origin
	particles_material.set_shader_param(shader_controller_position, position)

func _set_state(state):
	if state in [-1, 0, 1]:
		particles_material.set_shader_param(shader_controller_state, state)
	else:
		print("Error the state is not a valid state")

func _event_button_pressed(button_index):
	match button_index:
		15:
			print("Trigger pressed")
			_set_state(1)
		2:
			print("Grip pressed")
			_set_state(-1)

func _event_button_released(button_index):
	match button_index:
		15:
			print("Trigger released")
			_set_state(0)
		2:
			print("Grip released")
			_set_state(0)
Testing
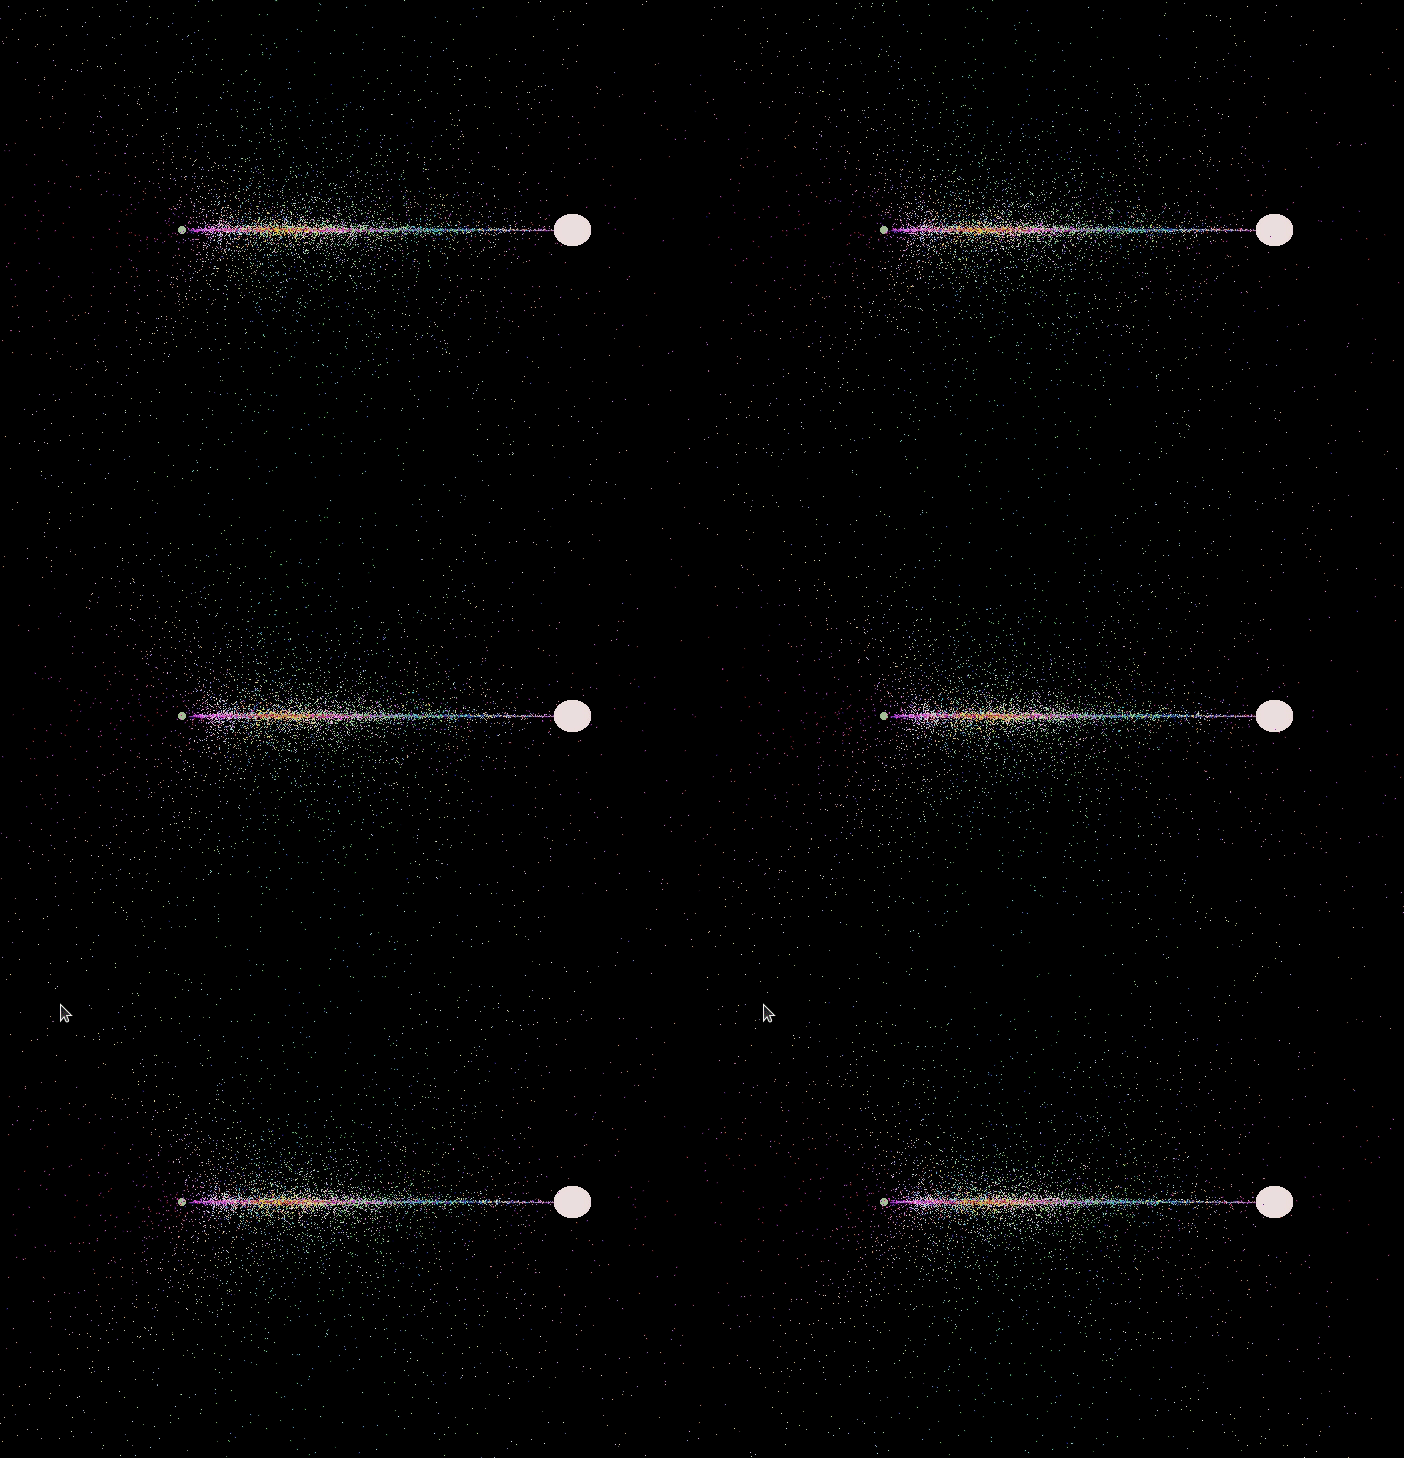
That’s it, fire it up and you should be able to interact with the particles.
A few things to consider
You can try and play with the number of particles, and go pretty high, on a Nvidia 2080 I can go as high as 8 millions particle and still maintain 90FPS :D.
You can play with the colors of the particles as well!
Finally you can extend this code and change the Vector Field we used for some pretty trippy stuff:
- https://demonstrations.wolfram.com/ArnoldBeltramiChildressABCFlows/
- https://demonstrations.wolfram.com/LorenzAttractor/
- https://demonstrations.wolfram.com/LorenzsModelOfGlobalAtmosphericCirculation/
- https://demonstrations.wolfram.com/ChaosAndOrderInTheDampedForcedPendulumInAPlane/
Homework
If you want the solution to the button presses issues:
extends ARVRController

onready var particles = get_node("../../Particles")
onready var particles_material = particles.get_process_material()

var shader_controller_position
var shader_controller_state
var trigger_pressed = false
var grip_pressed = false

func _ready():
	if controller_id == 1:
		shader_controller_position = "LeftController_position"
		shader_controller_state = "LeftController_state"
	elif controller_id == 2:
		shader_controller_position = "RightController_position"
		shader_controller_state = "RightController_state"
	else:
		print("The controller ID is outside of the legal values (1: Left, 2: Right)")
	connect("button_pressed", self, "_event_button_pressed")
	connect("button_release", self, "_event_button_released")

func _physics_process(delta):
	_set_position()
	_set_state()

func _set_position():
	var position = transform.origin
	particles_material.set_shader_param(shader_controller_position, position)

func _set_state():
	if trigger_pressed and not grip_pressed:
		particles_material.set_shader_param(shader_controller_state, 1)
	elif grip_pressed and not trigger_pressed:
		particles_material.set_shader_param(shader_controller_state, -1)
	elif grip_pressed and trigger_pressed:
		particles_material.set_shader_param(shader_controller_state, 0)
	else:
		particles_material.set_shader_param(shader_controller_state, 0)

func _event_button_pressed(button_index):
	match button_index:
		15:
			print("Trigger pressed")
			trigger_pressed = true
		2:
			print("Grip pressed")
			grip_pressed = true

func _event_button_released(button_index):
	match button_index:
		15:
			print("Trigger released")
			trigger_pressed = false
		2:
			print("Grip released")
			grip_pressed = false
Licence
This work under the Creative Common Licence CC-BY-NC-SA